How to start a NextJs project?
How to start a NextJs project ?
1. Prepare Develop Device
Macbook, Desktop computer,or other laptop, choose one of it you have.
| device | OS(operation system) | |:------------------|:----------------------:| | macbook | ios | | desktop computer | linux/windows | | other laptop | linux/windows |
2. Install development tools
- Nodejs/npm Node.js includes the npm tool, so there's no need to install it separately.
- Visual Studio Code Your code editor.
Nodejs/npm Download URL: https://nodejs.org/
Visual Studio Code Download URL: https://code.visualstudio.com/
After installing Node.js, you can use the command tool to check whether the installation was successful.
Example commands:
node -v  # Check Node.js version
npm -v   # Check npm version
If these commands return version numbers, it means Node.js and npm are properly installed.
After installing Node.js, you can optimize your development environment and toolchain with the following configurations:
(1) Configure npm (Package Manager)
Set Global Installation Path
Avoid sudo permissions (Mac/Linux) or polluting system directories:
# Create a global installation directory (e.g., ~/.npm-global)
mkdir ~/.npm-global

# Configure npm to use this directory
npm config set prefix '~/.npm-global'

# Temporarily add the directory to PATH
export PATH=~/.npm-global/bin:$PATH

# Make it permanent (add to ~/.bashrc, ~/.zshrc, or ~/.bash_profile)
echo 'export PATH=~/.npm-global/bin:$PATH' >> ~/.zshrc
source ~/.zshrc
Windows: Use npm config set prefix "C:\path\to\dir".
Change npm Registry
Speed up dependency downloads (recommended for China: Taobao mirror):
# Switch to Taobao mirror
npm config set registry https://registry.npmmirror.com

# Revert to official registry
npm config set registry https://registry.npmjs.org

# Check current registry
npm config get registry
Configure Proxy (if needed)
npm config set proxy http://proxy.example.com:8080
npm config set https-proxy http://proxy.example.com:8080
(2) Upgrade Node.js and npm
Upgrade npm
npm install -g npm@latest
Upgrade Node.js
-
Manually download and overwrite the latest installer
-
Or use a version manager (see below)
(3) Install a Version Manager (Recommended)
Switch between Node.js versions seamlessly:
nvm (Mac/Linux)
# Install nvm
curl -o- https://raw.githubusercontent.com/nvm-sh/nvm/v0.39.7/install.sh | bash

# Use nvm
nvm install 18.0.0  # Install a specific version
nvm use 18.0.0      # Switch versions
nvm ls              # List installed versions
nvm-windows (Windows)
(4) Install Global Tools
Development Tools
npm install -g yarn pnpm            # Alternative package managers
npm install -g nodemon              # Auto-restart Node apps
npm install -g typescript ts-node   # TypeScript support
npm install -g eslint prettier      # Code formatting and linting
(5) Environment Variables
Set NODE_ENV
Distinguish between development/production:
# Linux/Mac
export NODE_ENV=development

# Windows (Command Prompt)
set NODE_ENV=development

# Make permanent (add to shell config)
echo 'export NODE_ENV=development' >> ~/.zshrc
Adjust Memory Limits
Handle large files efficiently:
node --max-old-space-size=4096 app.js # Set 4GB memory limit
(6) Editor/IDE Integration, Install VS Code plugins
- VS Code: Install extensions (e.g., ESLint, Prettier, Debugger for Chrome)
(7) Security Hardening
Check Vulnerabilities
npm audit       # Scan project dependencies for vulnerabilities
npm audit fix  # Automatically fix some vulnerabilities
Avoid Global Installation Risks
-
Prefer npx for one-off commands (e.g., npx create-react-app)
-
Restrict global package permissions (npm config set ignore-scripts true)
(8) Performance Monitoring
Built-in Tools
node --inspect app.js          # Enable Chrome DevTools debugging
node --prof app.js && node --prof-process isolate-xxxx.log > profile.txt  # Generate CPU profile
Third-party Tools
PM2: Process management + log monitoring
npm install -g pm2
pm2 start app.js --watch
3. Set up a new Next.js project
Automatic installation
The quickest way to create a new Next.js app is using create-next-app, which sets up everything automatically for you. To create a project, run:
npx create-next-app@latest
On installation, you'll see the following prompts:
What is your project named? my-app
Would you like to use TypeScript? No / Yes
Would you like to use ESLint? No / Yes
Would you like to use Tailwind CSS? No / Yes
Would you like your code inside a `src/` directory? No / Yes
Would you like to use App Router? (recommended) No / Yes
Would you like to use Turbopack for `next dev`?  No / Yes
Would you like to customize the import alias (`@/*` by default)? No / Yes
What import alias would you like configured? @/*
After the prompts, create-next-app will create a folder with your project name and install the required dependencies.
Manual installation
To manually create a new Next.js app, install the required packages:
npm install next@latest react@latest react-dom@latest
Then, add the following scripts to your package.json file:
{
  "scripts": {
    "dev": "next dev",
    "build": "next build",
    "start": "next start",
    "lint": "next lint"
  }
}
These scripts refer to the different stages of developing an application:
- next dev: Starts the development server.
- next build: Builds the application for production.
- next start: Starts the production server.
- next lint: Runs ESLint.
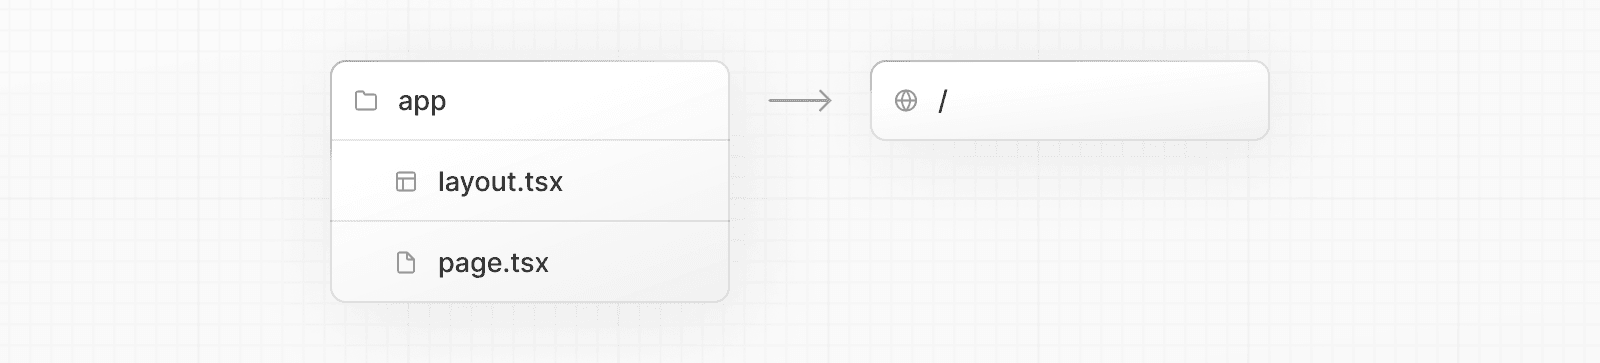
Create the app directory
Next.js uses file-system routing, which means the routes in your application are determined by how you structure your files.
Create an app folder. Then, inside app, create a layout.tsx file. This file is the root layout. It's required and must contain the <html> and <body> tags.
app/layout.tsx
export default function RootLayout({
  children,
}: {
  children: React.ReactNode
}) {
  return (
    <html lang="en">
      <body>{children}</body>
    </html>
  )
}
Create a home page app/page.tsx with some initial content:
app/page.tsx
export default function Page() {
  return <h1>Hello, Next.js!</h1>
}
Both layout.tsx and page.tsx will be rendered when the user visits the root of your application (/).
Good to know:
If you forget to create the root layout, Next.js will automatically create this file when running the development server with next dev.
You can optionally use a src folder in the root of your project to separate your application's code from configuration files.
Create the public folder (optional)
Create a public folder at the root of your project to store static assets such as images, fonts, etc. Files inside public can then be referenced by your code starting from the base URL (/).
You can then reference these assets using the root path (/). For example, public/profile.png can be referenced as /profile.png:
import Image from 'next/image'

export default function Page() {
  return <Image src="/profile.png" alt="Profile" width={100} height={100} />
}
Run the development server
- Run
npm run devto start the development server. - Visit http://localhost:3000 to view your application.
- Edit the
app/page.tsxfile and save it to see the updated result in your browser.
Set up TypeScript
Minimum TypeScript version: v4.5.2
Next.js comes with built-in TypeScript support. To add TypeScript to your project, rename a file to .ts / .tsx and run next dev. Next.js will automatically install the necessary dependencies and add a tsconfig.json file with the recommended config options.
VS Code Setting
Next.js includes a custom TypeScript plugin and type checker, which VSCode and other code editors can use for advanced type-checking and auto-completion.
Via VS Code open your project :
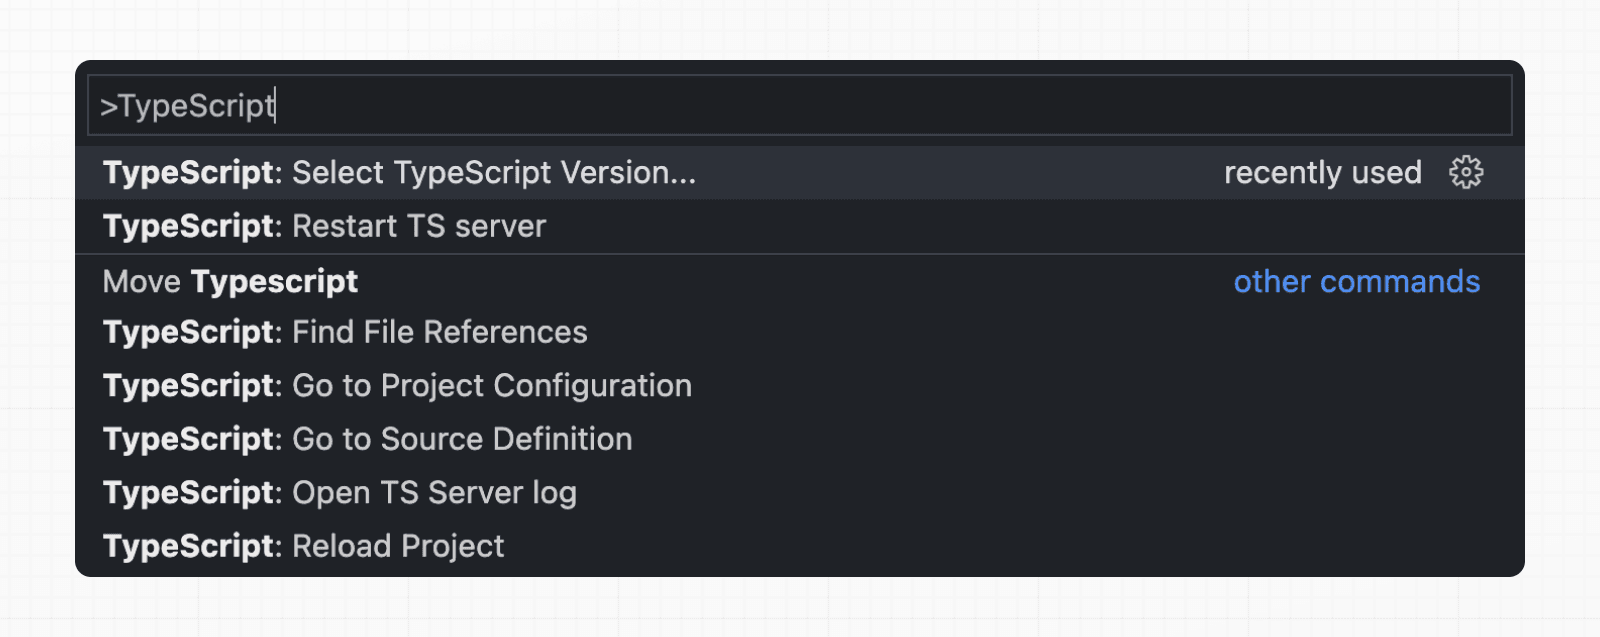
You can enable the plugin in VS Code by:
- Opening the command palette (
Ctrl/⌘+Shift+P) - Searching for "TypeScript: Select TypeScript Version"
- Selecting "Use Workspace Version"
See the TypeScript reference page for more information.